I spent two hours Thursday, and two hours tonight, cleaning the craft room. I've found that 1 cup of coffee = two hours motivation. It's almost ten o'clock at night, and I'm contemplating having another cup. It is Saturday.
I'm happy to be staying in on a Saturday night to clean. Is that grown-up, sad, or just OCD?
I've been to three graduations in three weeks. None of them were in Austin. One weekend also included a bridal shower and a wedding. I'm happy and proud for my family and friends, but now I've got to repay the cleaning debt created while playing out of town. I've a room, with all my cool arts and crafts stuff in it, and I've been avoiding it because there's been no floor. I'd really like to use it.
My mom's mother's day gift is pinned out on my blocking board, and it's sitting on the floor of the living room. If I found floor in the craft room, it could go there. I could turn the fan on, leave it there to dry, and not have to worry about tripping over it.
The two hours on Thursday I cleaned out the closet. I can now walk into the walk-in closet, and do so with out fear of being taken out by a stray wooden sword.
The second two hours I dealt with paper. I have acquired SO much paper. For our purposes "paper" is defined as tickets (from trips and concerts), correspondence (Christmas cards, invitations to weddings/showers/birthdays), and miscellaneous (patterns printed from online, receipts, magazine pictures, pretty postcards). I like to have firm proof that I went to this or that movie/wedding/country and when, and so I keep these bits and pieces. I have a terrible memory, so I feel if I hang on to this stuff I'll have a greater chance of remembering it. I'd also like to someday do some scrap-booking. I think.
It makes me think of Labyrinth, where the pack rat Muppet carries around a bunch of garbage on her back. I should get rid of most of it, but it's a bit like going through your old toys. I pick up a random piece of paper, remember that shower/birthday/concert and how much fun it was, and then put it back into the pile.
I am going to have that cup of coffee. The room doesn't have to be spotless, but I want to have the gift blocking in the middle of the floor by the time I go to bed. That's not going to happen without another cup of motivation.
Showing posts with label other crafts. Show all posts
Showing posts with label other crafts. Show all posts
Saturday, May 12, 2012


Thursday, January 12, 2012
Gingerbread! And lots of it.
The magic of the internet started working again. All hail the random gods of the internet. So you will now be subjected to many, many pictures of our gingerbread house.
And here it is again in all it's glory:
Next time: Christmas stuff I couldn't show you while I was working on it.
 |
| Don't worry there's a bigger picture at the end. |
How to make a gingerbread hobbit hole:
 |
| First assemble all your tools, preferably in someone else's much larger kitchen. (Thanks, Mom!) |
 |
| Cover the board you are going to use to hold the completed house with parchment paper. |
 |
| After having mixed the gingerbread the day before (it has to chill over night) roll it out on parchment paper. |
 |
| Form the gingerbread to the bowl you've chosen as a mold. (You did grease it, right?) |
 |
| Like so. |
 |
| As it cooks, if you've made your gingerbread too thick, it will start to crack. Take it out of the oven and patch with not quite cooked gingerbread (try to keep from burning yourself), and then pop it back in. |
 |
| We thought about greasing it, does that count? No? |
 |
| Make another one. |
And then a lot of work happens and you get to here:
 |
| Sorry for the blurry camera phone shot. I did the icicles. |
 |
| I also made the shed and the shovel, all by myself. I'm quite proud. |
 |
| Very proud, actually. |
 |
| I think the trees are fabulous. I had no part in them. |
 | |
| The wood pile used to be a gate, but I may have broken it. Twice. (Sorry KW.) |
 |
| |
Next time: Christmas stuff I couldn't show you while I was working on it.
Wednesday, December 21, 2011
Christmas saved - Gingerbread is a go.
Yoga on Monday was wonderful. I found out there is going to be a partner yoga again some time in March. So Monday was not actually the last class, and I'm glad.
Tuesday I saved Christmas when I remembered that bead is another word for button. I'd finished two of my Chevette inspired crocheted chokers (pattern forthcoming, pictures soon), except that I needed to sew the buttons on. There were no buttons. None to be found in the house. Despite the fact that I know SOMEWHERE I have a bag full, and all this less than an hour before the party where I was planning on giving them away. Enter the beads. Freak out averted. The party was great, and the gifts went over well.
This evening I went and made gingerbread dough with my sister. Weargued about discussed how we were going to build this year's gingerbread house. We have the same end goal, but different ideas of how to get there. Eventually we agreed on a new plan and got down to the business of making the dough. I think we are getting better at it - it didn't take nearly as long as it did last time. We stuck the dough in the fridge, it needs to be chilled, and then spent the rest of the evening watching Doctor Who with my dad and DH. Perfect.
I hope your Christmas preparations are going well.
Tuesday I saved Christmas when I remembered that bead is another word for button. I'd finished two of my Chevette inspired crocheted chokers (pattern forthcoming, pictures soon), except that I needed to sew the buttons on. There were no buttons. None to be found in the house. Despite the fact that I know SOMEWHERE I have a bag full, and all this less than an hour before the party where I was planning on giving them away. Enter the beads. Freak out averted. The party was great, and the gifts went over well.
This evening I went and made gingerbread dough with my sister. We
I hope your Christmas preparations are going well.
Monday, December 5, 2011
Delightfully Rainy Weekend
Friday we hung out with our usual crowd, always a good time. Saturday was rainy, so we stayed in for most of the day. I knitted and DH gamed while we watched Buffy. That evening we headed to YA, J and YS's gingerbread (read: graham cracker) house decorating party. Met a lot of new people, had a lot of sugary fun.


Sunday was also rainy, so knitting and Buffy in the morning. Then I headed over to Gauge Knits where I took a class on soap making (the heat-already-made-soap-add-scent-color-and-dye-then-pour-into-molds-to-set kind of soap making) taught by Knitcrawler. I preferred the soap re-combining to the soap making. It's easier and less caustic.
After class I headed home for more Buffy and knitting. I’m really, just about, almost done on this baby blanket. I’ve only two thirds of a row of blocks, the garter stitch boarder, and some blocking left. I hope to be done by Wednesday.
Next time: A review of Rainbow Yarn and Fiber in Memphis.

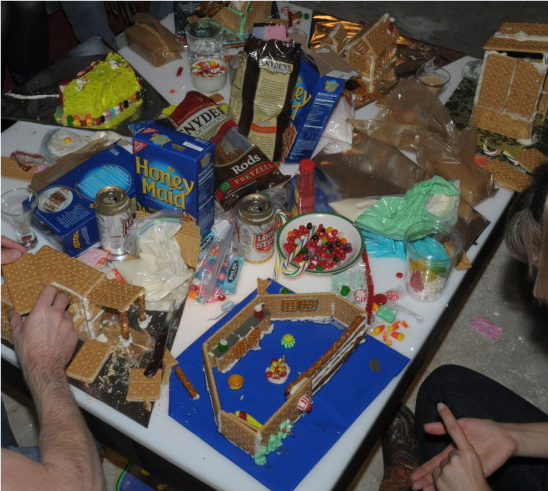
 |
| DH's creation |
 |
| My blurry manger. |
 |
| Here's the glycerin soap melting. |
 |
| The table before we started. |
 |
| Adding the dye and scent. |
 |
| Spraying the soap in the mold with alcohol to prevent bubbles forming. |
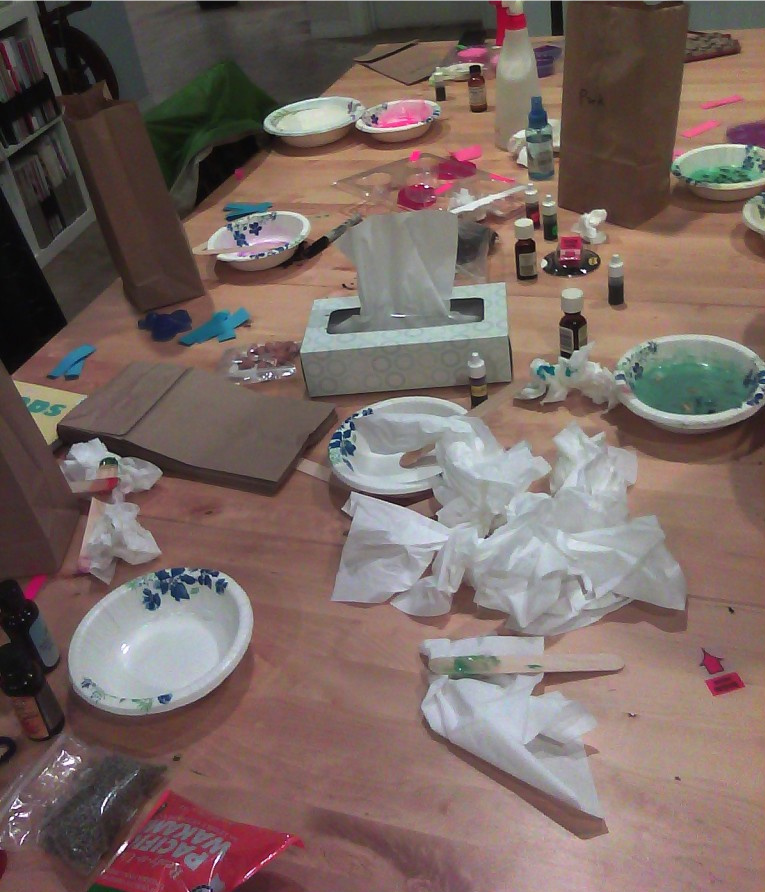 |
| The mess at the end of class. |
 |
| My finished soaps. These will probably be Christmas gifts. |
Next time: A review of Rainbow Yarn and Fiber in Memphis.
Wednesday, November 23, 2011
Lye to me.
The second class I took at Kid ‘N Ewe was Creative Soap Making. I enjoyed it, but it wasn't my favorite. It wasn't really the fault of the class. I was hungry and cold by the time I got there, so not in the most receptive mood. Also, while I had no preconceived ideas about using indigo to dye, Martha Stewart had colored my opinion of soap making. Can't be hard if it's a family project, right? I now know the soap making Martha is talking about is taking soap and adding ingredients, not at all the same as making soap.
Soap is not very complex; to make it you need three things: water, lye and oil. If you want to make soap quickly and efficiently you also need a thermometer, two bowls, two spoons, molds, non-stick cooking spray, a hand blender, and a Crockpot of some sort. Also, you should use eye protection and gloves, and have paper towels and vinegar on hand. The vinegar neutralizes the lye, should you spill it on yourself.
First we heated up our oils. We used a combination of Crisco, olive oil, and coconut oil. You can use the Crisco and olive oil by themselves, but the coconut oil supplies the lather.
We went outside and mixed our lye with the water.* This creates an exothermic reaction; the water went from room temperature to in the neighborhood of 120 to 140 degrees Fahrenheit. We poured the oil into a separate bowl and took its temperature. We wanted the oil and the lye/water mixture to be at the same temperature, that way they can cool down at the same rate.** Once both the lye mixture and the oils hit 100 degrees Fahrenheit, we poured the lye into the oil and stirred continuously. We were looking for when our soap got to trace.***
In order to get to trace without exhausting ourselves, we used the hand blender and gave it a good pulsing. It’s a fairly thick mixture so we gave it quick pulses, rather than sustained ones, or we'd have burned out the motor. Once we reached trace we poured the soap into molds that had been sprayed with non-stick spray. Then we mixed scent into the soap in the mold.
We let the soap sit over night. The teacher was going to cut them into bars in the morning, but they were too soft. So, I took mine home in their containers.
You want your soap to mellow for at least a week before you use it. Or, if you don’t want to wait, you can heat it in the oven at 250 to get it to mellow faster. I haven’t done the research on that, so I’m just going to wait.
Another way to add scent is to make the soap, let it mellow, then chop it up, melt it, mix in the scent and let it set again. That way the soap is less caustic and won’t break down the lighter fragrances. I’ll see how the soap turns out, but I may be doing this later. This, by the way, is the "soap making" Martha talks about.
Will I be making soap for Christmas? Probably not. The likelihood of me spilling lye all over the house and myself, the time it takes to make, getting the temperature just right, the scents I’d want, all add up to... not this year. Crochet it is.
*There’s no picture because this is the kind of dangerous part and I didn’t want to be distracted. Also, once you’ve got your gloves on, and have lye on them, you don’t want to take them off until you are done.
** You can reheat the oil as often as you want but the lye-water reaction is a one time thing. If it gets too cold before you mix it into the oil you need to toss it out and start again.
***Trace is where when you lift up the spoon out of the mixture and drizzle a line over the top, the line stays visible for a moment on top of the mixture before being reincorporated.
Soap is not very complex; to make it you need three things: water, lye and oil. If you want to make soap quickly and efficiently you also need a thermometer, two bowls, two spoons, molds, non-stick cooking spray, a hand blender, and a Crockpot of some sort. Also, you should use eye protection and gloves, and have paper towels and vinegar on hand. The vinegar neutralizes the lye, should you spill it on yourself.
First we heated up our oils. We used a combination of Crisco, olive oil, and coconut oil. You can use the Crisco and olive oil by themselves, but the coconut oil supplies the lather.
 |
| I think this is for frying turkeys. If I were to do this at home I'd use a little crockpot. |
We went outside and mixed our lye with the water.* This creates an exothermic reaction; the water went from room temperature to in the neighborhood of 120 to 140 degrees Fahrenheit. We poured the oil into a separate bowl and took its temperature. We wanted the oil and the lye/water mixture to be at the same temperature, that way they can cool down at the same rate.** Once both the lye mixture and the oils hit 100 degrees Fahrenheit, we poured the lye into the oil and stirred continuously. We were looking for when our soap got to trace.***
In order to get to trace without exhausting ourselves, we used the hand blender and gave it a good pulsing. It’s a fairly thick mixture so we gave it quick pulses, rather than sustained ones, or we'd have burned out the motor. Once we reached trace we poured the soap into molds that had been sprayed with non-stick spray. Then we mixed scent into the soap in the mold.
 |
| Our workspace once we were done. |
 |
| Still fairly caustic. |
Another way to add scent is to make the soap, let it mellow, then chop it up, melt it, mix in the scent and let it set again. That way the soap is less caustic and won’t break down the lighter fragrances. I’ll see how the soap turns out, but I may be doing this later. This, by the way, is the "soap making" Martha talks about.
Will I be making soap for Christmas? Probably not. The likelihood of me spilling lye all over the house and myself, the time it takes to make, getting the temperature just right, the scents I’d want, all add up to... not this year. Crochet it is.
*There’s no picture because this is the kind of dangerous part and I didn’t want to be distracted. Also, once you’ve got your gloves on, and have lye on them, you don’t want to take them off until you are done.
** You can reheat the oil as often as you want but the lye-water reaction is a one time thing. If it gets too cold before you mix it into the oil you need to toss it out and start again.
***Trace is where when you lift up the spoon out of the mixture and drizzle a line over the top, the line stays visible for a moment on top of the mixture before being reincorporated.
Wednesday, November 16, 2011
Indigo-go or Stand Back, I'm Doing Science!
The first class I took at Kid 'N Ewe was dyeing with indigo. I had no idea that it would appeal to my love of chemistry. This post is a bit heavy on the science, so if you are truly science averse you should move along, for those willing to stick it out I promise pretty pictures along the way.
The major issue with indigo dyeing is that indigo is not water soluble. So you have to mess with it’s chemistry in order to use it. First you take the indigo powder and suspend it in warm water. This is referred to as indigo paste, but, while I understand it’s a defined term so there’s no reason to argue with it*, I think it’s too liquidy to call a paste. Then you take some hot water and add an alkali and a reducing agent** to the mix to create “indigo white.”
That's Christine from spinning straw into gold, teaching us not to boil indigo. The temperature needs to be hot but not boiling (around 120 degrees Fahrenheit, do not exceed 140) for the reaction to be happy. After allowing time to pass for the reaction to take place, you end up with something that looks like this:
The stuff on the top is called “the flower” which is essentially unreduced indigo. (This is where I get to say one of my favorite chemistry jokes: If you’re not part of the solution, you’re part of the precipitate. I didn’t make it up; I wish I had.) If we were going to be very careful about what we were doing we’d scoop the flower off so that the unreduced indigo doesn’t cause crocking.***
We tried both organic and chemical dyeing. The reducer for the chemical was hydrosulfite, the alkali was lye; in the organic vat the reducer was fructose and the alkali was pickling lime. I love the idea of using organic sources (knowing how to do something in a post-apocalyptic world/learning how something was done pre-industrial age is fun), but you can get predictable results if you know exactly what you have in a solution.
As you can see the indigo "white" can range in color from green to amber. Pour your solution of indigo white into a vat that’s been prepped with a bit of the alkali and reducer. We decided to use the organic one Christine had made the day before, and the chemical we made in class.
I know it is green; I swear it dyes things blue. Let it sit for fifteen minutes to four hours. There seems to be a lot of waiting for stuff to react in indigo dyeing. If you are in a hurry, although I’ve not tried them yet, I think Kool-Aid or acid dyes are probably going to be your best bet.
Then you put on your dish washing gloves, or borrow them off someone else if you didn't bring your own, and dunk whatever it is you are going to be dyeing. If you are using the organic vat you want to hold it above the bottom of the vat (there’s icky stuff at the bottom) but completely in the solution so that the dye permeates equally. In the chemical vat you can drop your item off and have a cupa, as long as your cupa takes less than two minutes. The vat is rather alkali and if you left it in there for long it would end up destroyed.
When you take your dyed thing out, it’s kind of an ugly green color. As you open it up and expose it to the air you can watch the blue spread across as the extra hydrogen atoms in the indigo white react with the oxygen in the air returning it to indigo. It's really cool to watch.
Hang your items to try for 10 to 15 minutes then repeat the dunking until you attain the blue you are looking for, or until class is over. You must dunk your items at least twice in order for it to be chemically stable.
We attempted to dye silk and wool fibers and found that the silk takes dye like fish takes water, while wool is not a fan.
You have to be sure that your vats aren’t too alkali (you are looking for a PH of 8 to 10) or you’ll end up stripping the dye as you are adding it. Kind of like when you try to add a second coat to your nails while the first coat of nail polish is still wet.
We put our finished pieces in plastic baggies full of water for transport. Once I got to my sister’s place, I poured some white vinegar in to neutralize the base and then hung it to dry.
I was planning on giving this scarf away at Christmas, but I’m having a hard time giving it up. I think this class was the one I most enjoyed, but I’m probably not going to set up an indigo vat at home. Well, not yet.
*I dislike terms that are misleading. Atom means “cannot be broken” so how do you have sub-atomic partials? I know atom is now the word used for “the smallest particle of something that is still that thing.” But if you are going to use that explanation then what is the difference between a molecule and an atom? The molecule of indigo is the smallest part of indigo that is still indigo. I think they just got all excited and named things atoms too quickly. Okay, rant on poor naming conventions over.
**Reducer in organic chemistry means something adds hydrogen atoms to a molecule. In the case of indigo two hydrogen atoms are added to make indigo white. See above rant.
***Crocking is where the color rubs off of something dyed. The way to fix crocking for indigo is to place the item in a water bath with a little bit of alkali and a little bit of reducer mixed in. That way the unreduced indigo gets reduced and attaches itself.
The major issue with indigo dyeing is that indigo is not water soluble. So you have to mess with it’s chemistry in order to use it. First you take the indigo powder and suspend it in warm water. This is referred to as indigo paste, but, while I understand it’s a defined term so there’s no reason to argue with it*, I think it’s too liquidy to call a paste. Then you take some hot water and add an alkali and a reducing agent** to the mix to create “indigo white.”
 |
| Do not boil indigo! |
 |
| Green/brown? I thought indigo was blue. |
We tried both organic and chemical dyeing. The reducer for the chemical was hydrosulfite, the alkali was lye; in the organic vat the reducer was fructose and the alkali was pickling lime. I love the idea of using organic sources (knowing how to do something in a post-apocalyptic world/learning how something was done pre-industrial age is fun), but you can get predictable results if you know exactly what you have in a solution.
 |
| In order from left to right: organic made the day before, organic that day, chemical the day before, chemical that day. |
 |
| Not pond water. |
I know it is green; I swear it dyes things blue. Let it sit for fifteen minutes to four hours. There seems to be a lot of waiting for stuff to react in indigo dyeing. If you are in a hurry, although I’ve not tried them yet, I think Kool-Aid or acid dyes are probably going to be your best bet.
Then you put on your dish washing gloves, or borrow them off someone else if you didn't bring your own, and dunk whatever it is you are going to be dyeing. If you are using the organic vat you want to hold it above the bottom of the vat (there’s icky stuff at the bottom) but completely in the solution so that the dye permeates equally. In the chemical vat you can drop your item off and have a cupa, as long as your cupa takes less than two minutes. The vat is rather alkali and if you left it in there for long it would end up destroyed.
When you take your dyed thing out, it’s kind of an ugly green color. As you open it up and expose it to the air you can watch the blue spread across as the extra hydrogen atoms in the indigo white react with the oxygen in the air returning it to indigo. It's really cool to watch.
Hang your items to try for 10 to 15 minutes then repeat the dunking until you attain the blue you are looking for, or until class is over. You must dunk your items at least twice in order for it to be chemically stable.
 |
| The lighter ones were dyed with the organic dye. |
 |
| They were all dunked once, but look at the range of colors. |
We put our finished pieces in plastic baggies full of water for transport. Once I got to my sister’s place, I poured some white vinegar in to neutralize the base and then hung it to dry.
 |
| Pretty! |
*I dislike terms that are misleading. Atom means “cannot be broken” so how do you have sub-atomic partials? I know atom is now the word used for “the smallest particle of something that is still that thing.” But if you are going to use that explanation then what is the difference between a molecule and an atom? The molecule of indigo is the smallest part of indigo that is still indigo. I think they just got all excited and named things atoms too quickly. Okay, rant on poor naming conventions over.
**Reducer in organic chemistry means something adds hydrogen atoms to a molecule. In the case of indigo two hydrogen atoms are added to make indigo white. See above rant.
***Crocking is where the color rubs off of something dyed. The way to fix crocking for indigo is to place the item in a water bath with a little bit of alkali and a little bit of reducer mixed in. That way the unreduced indigo gets reduced and attaches itself.
Thursday, November 10, 2011
Kid N Ewe. I can't wait!
I’m almost ready to go to Kid N Ewe. The classes I’m taking on Friday are Indigo Dying and Creative Soap Making. If all goes well I may be giving out handmade soap for Christmas, if not crochet it is. I'd like to take Etsy 101and I Love Color, but they are at the same time as the Indigo class and dyeing wins out.
Saturday... I'm not sure what I'm going to do. My sister is getting a group of people together to go to Wurstfest but she’s not planning on leaving San Antonio till 7pm. I could go to Kid N Ewe that morning and meet up with her in the afternoon, but there just aren’t a lot of classes I want to take. There's a Beginning Tatting class that I'm interested in, but that's pretty much it. The One Pot Rainbow Dyeing sounds great, until you read the required gear list. It includes bringing your own heat source and large enamel pans - that’s not going to happen. The other idea is hang out in San Antonio and play Killer Bunnies until it's time to go eat sausage. I guess I'll see how I'm feeling that morning.
On Sunday, I’m taking A Spinner’s Workshop. I’d rather take Spinning the Exotics, but the Exotics conflicts with the class I’m really excited about, Cotton Spinning with a Tahkli Spindle. I’ve got a bunch of cotton that I’d love to be able to spin without fighting my wheel.
I’ve signed up for the classes on Friday and Sunday, so I have a reserved spot. If I do end up going on Saturday, I’ll probably be able to pick up a class or two. Either way I’ll be sure to take lots of pictures. I may bring home some fiber, and some yarn. I know, you're shocked.
Saturday... I'm not sure what I'm going to do. My sister is getting a group of people together to go to Wurstfest but she’s not planning on leaving San Antonio till 7pm. I could go to Kid N Ewe that morning and meet up with her in the afternoon, but there just aren’t a lot of classes I want to take. There's a Beginning Tatting class that I'm interested in, but that's pretty much it. The One Pot Rainbow Dyeing sounds great, until you read the required gear list. It includes bringing your own heat source and large enamel pans - that’s not going to happen. The other idea is hang out in San Antonio and play Killer Bunnies until it's time to go eat sausage. I guess I'll see how I'm feeling that morning.
On Sunday, I’m taking A Spinner’s Workshop. I’d rather take Spinning the Exotics, but the Exotics conflicts with the class I’m really excited about, Cotton Spinning with a Tahkli Spindle. I’ve got a bunch of cotton that I’d love to be able to spin without fighting my wheel.
I’ve signed up for the classes on Friday and Sunday, so I have a reserved spot. If I do end up going on Saturday, I’ll probably be able to pick up a class or two. Either way I’ll be sure to take lots of pictures. I may bring home some fiber, and some yarn. I know, you're shocked.
Wednesday, November 2, 2011
This Death Star is not quite operational...
So I tried to make the Death Star pumpkin.
I started out using my usual tools and got this far:

It wasn't working as well as I wanted, so I went to Jerry's Artarama.
 And bought these tools:
 The funky shaped one, on top of the yellow sponge, is fabulous at scraping the inside of a pumpkin. I don't think I'm ever going back to my spoon.
Then I continued carving away:
 But it took a really long time, and I'd other things going on. So I finished up the lines and called it done.
And forgot to take a picture of it until today. That's why it looks deflated.
 The first Death Star didn't turn out so hot, either.
I started out using my usual tools and got this far:

It wasn't working as well as I wanted, so I went to Jerry's Artarama.


 |
| It's so smooooth! |

And forgot to take a picture of it until today. That's why it looks deflated.

Wednesday, October 26, 2011
These are the pumpkins you're looking for.
Have I mentioned how much I love Halloween? I love Halloween. It might be my very favorite holiday. I love to dress up, always have, so a holiday devoted to dressing up and getting candy? What’s not to love?
So, yesterday I took the evening off from spinning, knitting, or going to the gym, to indulge in one of my all time favorite crafts. Pumpkin Carving!
Growing up I carved pumpkins with my family. And as the years went on the designs got more and more elaborate. We’d buy the Pumpkin Masters book and look and try the hard ones in the back. And then I went off to college and didn’t carve pumpkins for a few years, and I missed it. Since college I try to carve at least one pumpkin (if not more) for Halloween.
I carved one at a party a week or so ago. I’d show you, but it’s gone all black and fuzzy. I almost always carve pumpkins too soon for them to last till the great night of candy. So when DH asked if I wanted to carve a pumpkin for his work I jumped on the chance.
Set up:

Pumpkin guts are messy, so if you are going to do your carving inside, I highly recommend getting something to cover the floor. This year for easier clean up we took a large garbage bag, cut open, and laid it out. Previously I had used cardboard, but I think the garbage bag offered more coverage if less padding. To keep from sticking to the bag I put an old paper bag on the spot I was going to sit, and for comfort I put a pillow under the garbage bag. It worked like a charm, and I’m keeping this set up in the act.
The tools:

I have a favorite scraping spoon. It may, or may not, have been liberated from an old dorm cafeteria, but there is no way I’d ever give it back. It fits comfortably in most pumpkins and really digs into the insides so you can make the walls thinner. I used to only use the pumpkin kit tools. You know the ones - they’ve got black or orange handles, and there are different lengths of saws and things to poke holes and the like. They are great for your basic black and white pumpkin pattern. But one year I tried to do a complicated version of the Tardis and I gave up halfway through because I couldn’t make the cuts small enough.
Enter the woodcarving tools! These are great! And sharp! And I cut myself last year! More than once! With these a whole world of carving opens up. I got mine at a wood working shop here in Austin, but I’ve seen the exact same set sold on the Pumpkin Wizard website. I’ve also seen clay carving tools being sold for pumpkin carving and I think I may have to go get some. They are mostly used on the inside so you can get an even wall. When you are removing the skin but not cutting all the way through, you want an even thickness on the pumpkin wall because that way the same amount of light shines through. If it’s uneven you end up getting weird shadows.

My walls aren’t as even as they could be, but that’s not important because the pattern I picked out is plan black and white. No real scrapping required.
You attach the pattern to the front of the pumpkin. I get the paper just a bit damp, so it conforms to the pumpkin, and then tape it down. If you are old school, like I am, you poke holes through the pattern into the pumpkin to transfer the pattern. On that same pumpkin website there was transfer paper for sale. I may go new-school next year; I haven’t decided. Doing all the dots is a pain if you are in a hurry to carve, but if in no hurry it’s kind of relaxing. Maybe that’s just me.

You start at the center and work your way out. This isn’t as important for this particular pattern, but for intricate work you want as much stability as you can keep as you work your way out.

It may not look like much when it’s in the light.

But I think it’s pretty cool when it’s lit up.
I’ve found a tutorial on how to do the death star pumpkin. I am seriously considering doing one this year. I just need to find a very round pumpkin, and have 4 to 10 hours to spend carving it.
So, yesterday I took the evening off from spinning, knitting, or going to the gym, to indulge in one of my all time favorite crafts. Pumpkin Carving!
Growing up I carved pumpkins with my family. And as the years went on the designs got more and more elaborate. We’d buy the Pumpkin Masters book and look and try the hard ones in the back. And then I went off to college and didn’t carve pumpkins for a few years, and I missed it. Since college I try to carve at least one pumpkin (if not more) for Halloween.
I carved one at a party a week or so ago. I’d show you, but it’s gone all black and fuzzy. I almost always carve pumpkins too soon for them to last till the great night of candy. So when DH asked if I wanted to carve a pumpkin for his work I jumped on the chance.
Set up:

Pumpkin guts are messy, so if you are going to do your carving inside, I highly recommend getting something to cover the floor. This year for easier clean up we took a large garbage bag, cut open, and laid it out. Previously I had used cardboard, but I think the garbage bag offered more coverage if less padding. To keep from sticking to the bag I put an old paper bag on the spot I was going to sit, and for comfort I put a pillow under the garbage bag. It worked like a charm, and I’m keeping this set up in the act.
The tools:

I have a favorite scraping spoon. It may, or may not, have been liberated from an old dorm cafeteria, but there is no way I’d ever give it back. It fits comfortably in most pumpkins and really digs into the insides so you can make the walls thinner. I used to only use the pumpkin kit tools. You know the ones - they’ve got black or orange handles, and there are different lengths of saws and things to poke holes and the like. They are great for your basic black and white pumpkin pattern. But one year I tried to do a complicated version of the Tardis and I gave up halfway through because I couldn’t make the cuts small enough.
Enter the woodcarving tools! These are great! And sharp! And I cut myself last year! More than once! With these a whole world of carving opens up. I got mine at a wood working shop here in Austin, but I’ve seen the exact same set sold on the Pumpkin Wizard website. I’ve also seen clay carving tools being sold for pumpkin carving and I think I may have to go get some. They are mostly used on the inside so you can get an even wall. When you are removing the skin but not cutting all the way through, you want an even thickness on the pumpkin wall because that way the same amount of light shines through. If it’s uneven you end up getting weird shadows.

My walls aren’t as even as they could be, but that’s not important because the pattern I picked out is plan black and white. No real scrapping required.
You attach the pattern to the front of the pumpkin. I get the paper just a bit damp, so it conforms to the pumpkin, and then tape it down. If you are old school, like I am, you poke holes through the pattern into the pumpkin to transfer the pattern. On that same pumpkin website there was transfer paper for sale. I may go new-school next year; I haven’t decided. Doing all the dots is a pain if you are in a hurry to carve, but if in no hurry it’s kind of relaxing. Maybe that’s just me.

You start at the center and work your way out. This isn’t as important for this particular pattern, but for intricate work you want as much stability as you can keep as you work your way out.

It may not look like much when it’s in the light.

But I think it’s pretty cool when it’s lit up.
I’ve found a tutorial on how to do the death star pumpkin. I am seriously considering doing one this year. I just need to find a very round pumpkin, and have 4 to 10 hours to spend carving it.
Wednesday, August 10, 2011
Finished stuff, part deux!
Last night my sister and I finished up the Gamma Delta Iota tee.
We made (read: she made and I worried and critiqued) our own stencils using painter’s tape. The trick, I’ve now learned, is to lay the tape out with multiple layers on cardboard, draw out the design, and then use an x-acto knife to cut it out. Don’t lift the tape too many times when you are cutting it out; if you do the tape won’t stick to the shirt enough to keep the spray paint from seeping. Crisp edges are your friends. Also, when spraying be sure to cover the rest of the shirt with painter’s tape, the glitter will get everywhere otherwise.
I am silly proud of this. I know that my sister did most of the work, but it’s just so darn cool. And I helped.
The other thing I made in the last few days was this:
I’ve been wondering where to keep the yarn I’d spun. I guess I could keep it with the “store bought” yarn but that just doesn’t seem special enough. So when I noticed this pattern I thought, “Hey, I’ve got a giant skein of yarn I bought because it was huge and purple. I could use it for this!”
I cast on using the provisional cast on and size 17 needles. It took two evenings, and I was knitting it continental style since it is supposed to be easier on the hands. The basket is basically a giant knit cylinder, and then you thread a piece of yarn around one edge and pull tight like a drawstring bag.
I may be making a bunch more. It’s quick and easy and I need to practice my continental knitting skills. I’ve thought about making a Doctor Who scarf. It would be great for working out tension, plus it is so wonderfully geeky... I just can’t make myself do it left handed. I’ve decided I need instant gratification projects because knitting continental makes me I feel so clumsy and slow.
I have a major project coming up. It’s called Organizing the Craft Room (cue: screams). I hope that making baskets of some sort or other is going to help, not hurt this endeavor. I’ll post pictures of what it looked like once I can take pictures of the progress. To post just “the before” pictures would be too depressing.

 |
| This is what it looked like while drying. |
 |
| Once the tape was removed. |
 |
| And here's what it looks like on. |
The other thing I made in the last few days was this:
 |
| The, apply named, Yarn Basket. |
 |
| It could also double as a hat for Hagrid. |
I may be making a bunch more. It’s quick and easy and I need to practice my continental knitting skills. I’ve thought about making a Doctor Who scarf. It would be great for working out tension, plus it is so wonderfully geeky... I just can’t make myself do it left handed. I’ve decided I need instant gratification projects because knitting continental makes me I feel so clumsy and slow.
I have a major project coming up. It’s called Organizing the Craft Room (cue: screams). I hope that making baskets of some sort or other is going to help, not hurt this endeavor. I’ll post pictures of what it looked like once I can take pictures of the progress. To post just “the before” pictures would be too depressing.
Subscribe to:
Posts (Atom)